
Are you new to innovation and want to learn how to innovate fast? Are you a startup needing to get product-market fit? Do you want a better way to collaborate, test ideas, and make decisions based on real user feedback?
The design sprint methodology will totally change how you innovate!
Read on to learn the proven method to innovate really fast that is used by teams around the globe.
What is a Design Sprint?
A Design Sprint is a structured step-by-step process to solve problems and test ideas through a series of innovation exercises and activities.
Jake Knapp is the original inventor of the method when he was working at Google Ventures.
Then, together with John Zeratsky and the team at Google Ventures, they perfected design sprints by helping numerous startups solve their biggest challenges.
While the Design Sprint has its roots in tech startups, it can be applied across a diverse range of problems and sectors, from service design, strategy, or team alignment – the list goes on.
The secret to this global phenomenon is its creative toolkit of proven design thinking, strategy, innovation, and behavioural science exercises within the constraint of five days.
Since its inception, the Design Sprint method has been refined by AJ&Smart with version 2.0 (a four-day version) and evolved into numerous shorter sprints tailored for specific purposes like brand sprints, strategy sprints, decision sprints.
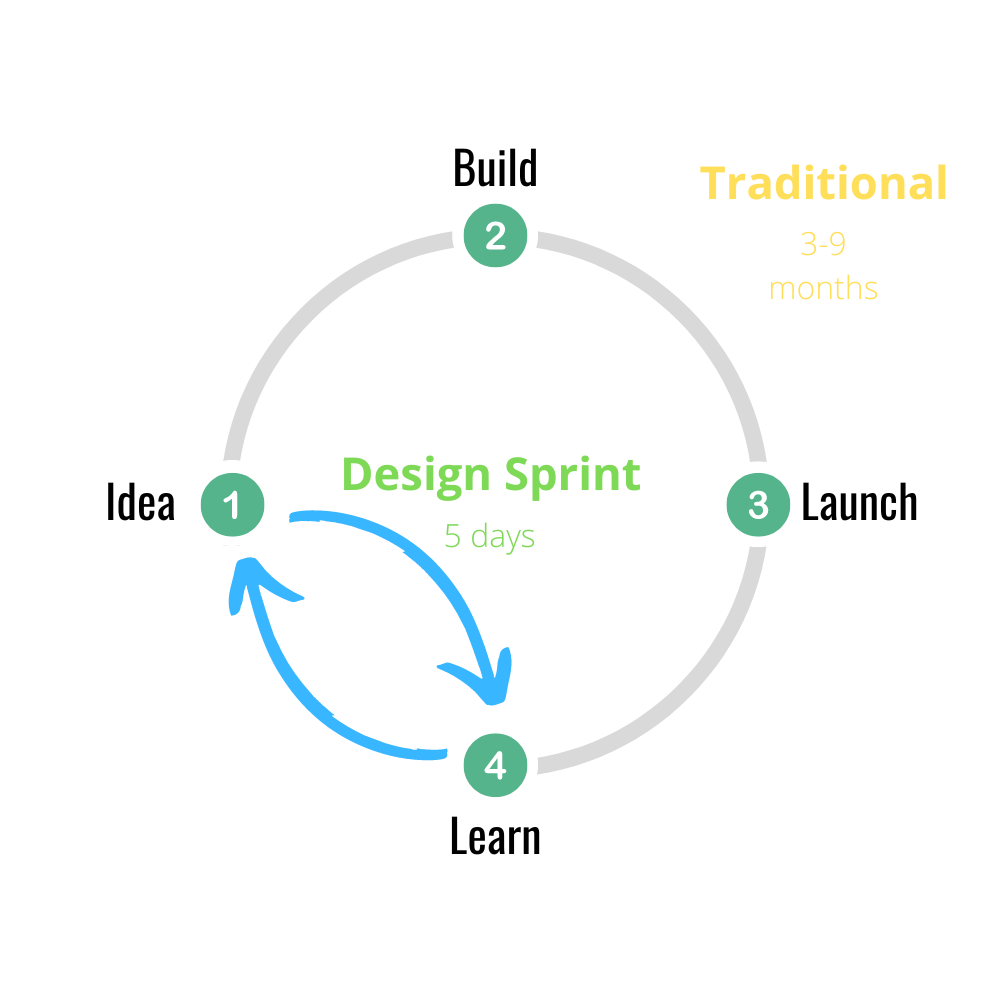
So, think of the Design Sprint as a way to reduce risk, learn faster, collaborate better on any innovation project or business problem.
What Type of Challenges Are Good for Design Sprints?
There really aren’t many challenges that a sprint won’t be a good fit for.
However, keep in mind that it is a SPRINT so longer-term projects aren’t often suitable unless they are broken down into smaller projects.
Here’s some guidance for what often is a suitable challenge for a Design Sprint:
- Something that is important enough to get the commitment from key stakeholders for five days.
- Something that will incur significant resources (money, time) if things go wrong. A Design Sprint is a great tool to derisk a project.
- When there is a critical deadline. Sprints help get things done – fast.
- When a project or startup needs a boost. A design Sprint can help unlock creativity and build momentum again.
- And, when you need to learn how customers will interact with a product or service.
The big idea here is that a design Sprint will focus and align your team to solve a problem and learn from feedback with real users BEFORE you invest considerable time, effort and money to build the real thing.
It is a way to validate ideas without a huge commitment.
What are the Benefits of Design Sprints?
There are several benefits to Design Sprints:
- A Design Sprint shortcuts many days or months of traditional innovation into five impactful days.
- The right diverse people are gathered to work on the project with focus and clarity.
- A Design Sprint stops the endless emails and meetings to deliver something tangible within a short space of time.
- A Design Sprint has users at the centre by testing a prototype at the end of the week.
- The Design Sprint gets the team in the mindset of failing fast and iterating. The learning cycle is increased.
Who is in a Design Sprint Team?
The ideal team for a Design Sprint is a diverse mix of cross-functional experts.
The team must always include a decider. The decider is the person responsible for deciding on critical aspects during a Design Sprint.
Often the decider is the CEO or Product Manager (or a substitute that has their decision-making authority).
Additionally, the following roles are typical participants:
- Marketing.
- Sales.
- Logistics / Manufacturing.
- Finance.
- One or two designers.
- In a perfect world, a customer would also be included.
- Plus, a facilitator. Usually, it’s best to have an external facilitator to allow the team to work on the sprint rather than be worried about keeping things on track.
Four to seven people seems to be the right amount of people to have in a Design Sprint without it becoming messy or cumbersome and slowing things down (remember it is a sprint).
Tip: The Decider is critical, in that they have the authority within the organisation to make the big calls, and, won’t be overridden by someone else.
If this isn’t clear at the start then it could derail the whole sprint. As a minimum they need to be involved on Monday and part of Wednesday.
Bonus Tip: Don’t just include people that think alike. We need people in the room who are a mix of ‘Yes, but’ people or ‘Yes, and’ people.
Design Sprint Core Principles
There are four core principles from version 2.0 that I think are essential to help run a Design Sprint. They are:
- Together, alone. Together, alone means that on some of the exercises, individuals will be working on ideas themselves and then sharing their ideas back to the team. This principle helps give airtime to introverts and manages more dominant characters so everyone can get their thoughts and ideas out.
- Tangible is better than discussion. Rather than circular discussions, creating things visually communicates so much more and provides clarity of concepts.
- Getting started over being right. One for the procrastinators (myself included). It’s not about the perfect solution, it is about moving forward and evolving things as you go.
- Don’t rely on creativity. The good news is that you don’t need to be the ‘creative type’ or in the mood for creativity. The process helps produce solutions that can be creative (or not).
The 5 Stages of a Design Sprint - Step by Step Guide
In keeping with the original version, we’ll focus on what happens during the five days (stages) and not the 2.0 version.
Starting with the original method will really help to give you a good grounding in Design Sprints.
1. Monday - Map
The big idea for Monday is to shape the direction for the weeks’ work.
It starts with setting a goal, identifying key assumptions and framing as questions, mapping the challenge, gaining insight from experts, and deciding where to focus.
Two-year Goal
Set a goal for the challenge that is aspirational, optimistic and feels achievable in the near term. This should be what you want your future to look like.
Have everyone in the sprint team write down their idea for a goal on individual post-it notes – ‘In two years time …’
For example, ‘In two years time, our cleaning service customers will be using us every week and telling their friends about us.’
Then, use the Note and Vote (more on that later) technique to select the starting goal.
Identify the Sprint Questions
Sprint questions are the critical assumption-based questions that you want to answer from the sprint.
They become guidance for prototyping and for keeping things on track.
Also, it helps move us from a mental state of ambiguity to one of curiosity.
Have the team think about things like – What would need to be true for the goal to be achieved?
Or, What are the things that could stop us from achieving our goal? Try, creating a pre-mortem to uncover what may have caused your goal to fail?
Then, rephrase the identified issues into a Can we … question. For example, Can we get people to sign up for our webinar?
Draw the Map
The map is a key piece of work that centre’s the group on throughout the week.
It is a high-level visual story of the main steps that a product/service flows through and who is involved.
It looks like a very simple journey map using only a few words and some arrows.
The steps are:
- List the actor/s on the left-hand side of a whiteboard e.g. Customer or Deliveryman.
- On the right-hand side write what the end result is e.g. Customer purchases goods
- Fill in the main steps (often five to ten or so) and draw the arrows that show the interaction flow for each actor
Don’t worry, it doesn’t need to be perfect and may evolve as you learn more. Simply, make a start.
Learn From the Experts
This step is designed to surface all the different knowledge about the challenge from a range of experts.
The team hold individual 30-minute interviews and document any notable comments that can add to the map or sprint questions, uncover additional pain points or deeper meaning.
The team use open-ended questions like:
- What do you think is missing? Why?
- What could be done better?
- What are the biggest obstacles?
- How would you go about solving this?
- Tell me more about … ?
Capture any notable comments onto an individual post-it notes while turning them into a How Might We Question (HMW’s).
HMW’s are a way of reframing problems into something that is exploratory, optimistic and collaborative. For example, changing the problem from ‘the check-out is really cumbersome’ to ‘HMW create a better checkout flow?
Then place all the sticky notes randomly on to a wall and start organising into themes. Read more about this process here.
Next, use ‘note and vote’ to prioritise the HMW’s, remove the notes with the most votes and place them in the relevant position on the map.
Tip: The experts may be from within the sprint team or from outside.
The main objective is to interview someone who has a good understanding of the strategy, the customer perspective (could actually be a customer), the in’s and out’s of the product or service, someone with knowledge of what’s been tried before.
Choose a Target
Choosing a target is the last task for the Monday and sets the focus for the Design Sprint.
This is the big moment for the decider to pick one target actor and one target event by circling them on the map. Then, the decider also selects the one or two sprint questions that relate to the chosen target and will be what we need to answer.
Tip: Often the map will end up following a Discover, Learn, Use journey. So, if you are not sure where in the journey to target, choose something further upstream in the flow.
2. Tuesday - Sketch
Tuesday is about creating solutions. In the first half of the day you’ll iterate existing ideas and then in the afternoon sketch out the ideas.
Lightening Demos
Think of Lightening Demos as reaching out into the world to find examples of inspiration that might solve the target problem.
They could be from competitors, similar concepts, solutions from different fields that solve a the same sort of problem or old ideas that haven’t seen the light of day yet.
Really, just capture anything that you think might be useful. The key here is to understand why you’re drawn to it to share with the team.
Sketch out the ideas or print screen shots and give it a name while also identifying the interesting elements.
Then, each team member presents their ideas back to the group giving a ‘demonstration’ of what is great about this particular concept.
As each idea is presented, the time to critique isn’t now. Now, is the time to share all the ideas that might be useful and display them on a wall.
Sketch Solutions
Sketching uses a four step method to create and develop solutions, note-taking, doodling, crazy 8’s and a three part concept.
Each team member will work individually to create competing solutions that the team can then … you guessed it – note and vote.
Step One – Note-taking. This step is to collate and synthesise the work done so far to refresh your memory (20 minutes).
Firstly, write down the two year goal, the HMW questions, review the lightening demos and record anything that is of interest that you think is useful.
Next, dig deeper on some things that you think are really important. You can research further or even come up with new ideas.
Then, highlight anything that really stands out for you amongst your notes.
Step Two – Doodling ideas. Start forming these notes into rough doodles giving life to the ideas using drawings of props or people and key points.
This is about starting to tease out ideas in a visual way i.e not worrying about their drawing ability.
After creating the doodle for twenty minutes, then mark your favourite ideas.
Step three – Crazy 8’s. Crazy 8’s is stretches each team member to create different versions of their best idea and tries to rapidly sketch out eight versions of the same idea, each iterating on the previous (8 minutes).
Take some A4 sized paper and fold it in half three times so that you end up with eight sections.
Each person has eight minutes to quickly sketch out eight different ideas.
Step four – Three step concept. The storyboard is each person’s best idea sketched out in three steps (30 – 45 minutes).
Here is where the details are added and it becomes a first ‘prototype’ idea to test.
Some important rules are:
- The sketch should speak for itself
- Keep the sketch anonymous
- Don’t worry how it looks
- Build context with example text or annotations
- Make it interesting with a cool title
Once finished put all the sketches into a pile and call it a day.
Wednesday - Decide
On Wednesday you will decide which solutions to prototype and create a storyboard.
Decide
To avoid as much circular discussion as possible, Jake Knapp developed five steps to arrive a a decision. The steps are called art museum, heat map, speed critique, straw poll and super vote.
Step One – Art Museum. First thing in the morning take the pile of concept sketches and stick them to the wall in a row (just like you would see in a museum).
Step Two – Heat Map. Give everyone twenty or so dots and place dots on the most interesting parts of each concept. Record any questions you may have onto post-it notes and place them underneath.
The heat map provides guidance and visualises the opinions of the team.
Note – People can place as many of their allocated dots onto any of the concepts or components of. Additionally, this is all done in silence.
Step Three – Speed Critique. The group gather around each concept and for three minutes.
Firstly, nominate a scribe to capture the the discussions and key messages on to sticky notes.
Then, the facilitator speaks to each concept mentioning the big ideas (heat).
Next, the team do the same, highlighting anything that may have been overlooked.
Lastly, the ‘creator’ of the concept gets to fill in any missing pieces (they only talk at the end).
Step Four – Straw Poll. Everyone has ten minutes to decide on their favourite sketch (or part of). Then, each person places one dot on their chosen idea.
Next, each person gives a brief description of what they like about the idea and why.
The decider listens to the teams views before making the final decisions.
Step Five – Super Vote. The decider now gets three dots and can place the dots on different components or all on one concept.
The selected concepts with the super votes become the basis for the prototype. remember to keep all the other concepts on hand because they may be called upon later.
Storyboard
The storyboard is a way of taking all the winning sketches and connecting them into a tightly knitted story.
It’s like a plan for your prototype and consists of around twelve panels in comic book fashion.
Start by drawing the panels on a whiteboard. Then, select an opening scene such as, an advertisement referring to your service, or social media feed with your product being mentioned.
Next, complete the remaining panels one at a time until your story is finished. Use aspects from winning sketches to help fill things in.
There are also some rules for creating the storyboard:
- Use the ideas that you already have
- Any copy writing is best left to one person
- Provide enough detail so that there are no unanswered questions on what to do next.
- If in doubt, the decider decides.
- Reach for big bets if your unsure
The whole story should be able to be understood in less than fifteen minutes.
Thursday - Prototype
Thursday is where you really get to work on a prototype that is a facade or just enough to be believable for testing on day five. In fact, it’s more about mindsets and philosophies as well as prototyping.
The Right Mindset
Here are the mindsets that will help you to prototype:
- Anything can be prototyped.
- Be prepared to throw the prototype away.
- Low fidelity is fine, just enough to learn.
- Users need to believe it is the real thing.
Build a Prototype
A prototype can be made from really simple tools. Some tools could be:
- A script for customer call centre.
- Keynote for creating a fake application .
- Brochure for showing a product.
- No-code prototyping software for a higher fidelity website or app.
- Premises that have been mocked up to look real.
- A pop up kiosk in a mall with marketing material.
The four key steps here are:
- Use the right prototyping tools.
- Split the work up and work on different parts.
- Join the parts together.
- Rehearse and fix anything before tomorrow.
Lastly, this is the chance to have one last alignment with the sprint questions. is the prototype likely to answer these?

Friday - Test
You’ve made it to the last day. All of your hard work is about to be judged by the only people that really count, your customers.
But, most of all it is a chance to learn more, so you’ll know what steps to take next.
How Many Users Are Needed?
As strange as it seems, usually only five users are needed to test the prototype.
It has been proven that five users will provide about 85% of the insights. So, anything more than that doesn’t provide a significant return on your invested time and energy.
What you are looking for is usually the commonalities of experiences. For example, do two or three people get stuck at a certain point?
Or, show that something is frustrating them or delighting them? More so, you’re looking to understand the why behind anything they say or do.
Interview Tips
It’s important to follow a structured approach to the interviews. These are the recommended five steps:
- Build rapport. Welcome the participant and put them at ease with a warm greeting and a welcoming smile. Help them relax, keeping the discussion informal and outlining the process. Give them time to ask any questions they have.
- Understand their world. Give some context to the discussion by asking questions about their life i.e. ‘what do they do’? ‘Where do they live’? Then without introducing the prototype, ask questions around the area that your product or service sits within.
- Share the prototype. Now that the person is comfortable and you have some background information, introduce the prototype for them to experience. Put them at ease, that it’s a prototype, it’s not perfect but testing the prototype will really help the team. Have them share their thoughts as they experience the prototype, hit roadblocks, don’t understand something or really enjoy an aspect.
- Prompt where needed. Sometimes you may need to ask questions in a particular direction, just keep them open-ended. An example might be, ‘what are you thinking here’? Or, ‘How wold you go about using this’?
- Wrap up. As the interview concludes, it’s good to finish of with some closing likes and dislikes. For example asking ‘what did you like most about …’? Or, what was your least favourite thing’? Or, ‘What is one thing we could do to improve the experience’?
Additionally, and with the appropriate consents from the participants, it’s a good idea to be able to video the interviews.
Firstly, it frees the interviewer up from having to take notes thereby being less observant.
Secondly, you can go back over the footage and gain insight from their expressions and movements.
Thirdly, the rest of the team could be in a separate room observing and making observations – which brings me to a very important step.
Learn together
It is recommended to have all the team observe the interviews together so the insights are credible and experienced at the same time therefore not needing more meetings to review the findings.
The team can take their own notes, which are then placed on a grid that has the participants names across the top and the main section or sprint question down the left-hand side.
The notes can include, observations, quotes, really anything that sticks out. Then, look for themes and mark as positive, negative or neutral.
Next, assess whether you have answered the key sprint questions, determine what has been learned, and decide on the next steps (the decider might come in here too).
Design Sprint Agenda Snapshot
Monday – Map
- Set the 2-year goal
- Identify sprint questions
- Draw the map
- Learn from experts
- Choose a target
Tuesday – Sketch
- Lightening Demos
- Sketch solutions – 4 part process
- Note-taking
- Doodling
- Crazy 8’s
- Three-step concept
Wednesday – Decide
- Decide – five step process
- Art Museum
- Heat Map
- Speed Critique
- Straw poll
- Super Vote
- Storyboard
Thursday – Prototype
- Get the right mindset
- Build a prototype
Friday – Test
- Five users experience your prototype or service and provide feedback
- Learn together
Design Sprint Resources
If you’re looking for more on the original design sprint then I totally recommend starting with the sprint book.
There are also some free resources available on the same website or start with these:
- AJ&Smarts YouTube channel
- Wayfair’s presentation template
- Get checklists here
- Or, the facilitators handbook here.
Design Sprint Facilitation Tips
- Warm-up the participants. It’s a good idea to break the ice at the start of a workshop to release some of that nervous tension.
- Layout the ground rules. Making it clear what the rules are about devices, breaks and ‘a safe zone’ helps everyone start on the same page.
- Manage expectations. During the workshop it is likely that participants will experience lots of ups’ and downs’ – so put that on the table. At the same time, capture (on a white board) what the group expectations are. You might hear things like ‘not waste my time’ or, ‘get a solution’. These are all valid and it’s best to acknowledge them and put them to one side.
- Have an agenda. Display your agenda so that you can refer back to it throughout the workshop. Doing so, helps keep you on track and the participants know what’s happening and get a feeling of accomplishment as we tick things off.
- Remain flexible. Now that you have an agenda, it’s good practice to keep flexible when you sense the energy levels are dropping or people are not making progress. Have a select few exercises that you can call upon to inject some fun or create that breakthrough.
Materials for a Design Sprint
These are some of the most useful supplies you’ll need for a design Sprint:
- A room to allow the sprint without interruption and space for making the prototype
- Rectangular post-it notes
- Square post-it notes – yellow plus two other colours
- Sharpies
- Small red sticky dots
- Large green sticky dots
- A time timer
- Scissors
- Glue sticks
- A4 paper
- Music
- White boards
- Snacks and water
- Camera
- Masking tape or blue tack
Summary
In summary, the Design Sprint is a proven five day recipe for innovation.
During the course of a week, you’ll create a vision and focus on a problem area, ideate and draw novel solutions, make choices using collaborate techniques, build a realistic prototype and get feedback in real-time from customers.
Sprints are used worldwide, by startups or existing businesses to solve important problems, gain alignment and kick-start momentum for any product or service.
Let me know your thoughts. Have you used Design Sprints? Or, would you like to give them a go?